 Android mobile applications have the advantage of being deployed on mobile devices that have touch displays. This enhance the user experience and allows developers to design the user interface so it will be dynamic, easy to use and efficient. Despite this advantage, the display size and usability concepts (one golden rule is to have all the window controls visible on the display) limit the number of buttons and visual controls that can be placed on a single window/form. So, application wide options and functions can be made available using a menu, leaving the display for particular and contextual options.
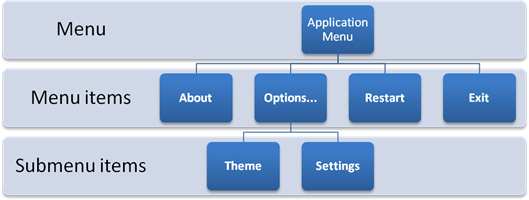
A menu is a group of options (items) that are accessed using the device Menu key. The menu items are represented by single options or by groups of options, which are organized in submenus.
In this article, we will see how to add a menu to the Android application. The solution is implemented using both the programmatic and the declarative solution that uses menu.xml files. For the declarative solution we will use also the Android visual editor for menus.
Other topics that are part of this Android tutorial are accessible through Android Tutorial – Overview and contents.
The structure of the menu that we are defining for the Android mobile application is:
The menu is activated using the device Menu key (1) and it looks like this:

For each of the two examples, we modify the Android skeleton application generated by the ADT plugin in Eclipse:
- Project name: MenuExample
- Create new project in workspace: checked (default value)
- Use default location: by default in the Eclipse workspace or you can change it
- Build target: select Android 2.3.3 (Gingerbread);
- Application name: Android Menu Example (name in the application title bar)
- Package name: eu.itcsolutions.tutorial.android
- Create Activity: MenuExampleActivity (leave the option checked and set the Activity name)
- Min SDK Version: 10
How to add a menu in a programmatic manner, using Java code.
Any Android mobile application has by default a menu, but it has no items. When the Activity is created, the system provides an empty menu managed by an android.view.Menu reference. Also, the Android platform generates an event that has a handler in the Activity class, the onCreateOptionsMenu(Menu menu) method. The method receives the Menu reference as its argument and it will allow us to define the application menu.
The steps needed to add a menu to the Android application using Java code:
1. We must get the Menu reference to the application menu. Because android.view.Menu represent an interface, we can’t construct a new menu object and we are limited to the one constructed by the system. To do that, we will override the Activity class onCreateOptionsMenu(Menu menu) method:
    @Override
    public boolean onCreateOptionsMenu(Menu menu)
    {
  	// call the base class method
    	super.onCreateOptionsMenu(menu);
    	return true;
    }
2. Menu options are managed by android.view.MenuItem objects which are created using the add() method of the Menu reference:
- add(CharSequence title) – adds a new menu item with a text given by the title argument
- add(int titleRes) – adds a new menu item that has its text defined as a resource; most probably in strings.xml; for any String value defined in string.xml it is generated an integer ID, a string resource identifier, in the R class (R.string.stringName) (Android Tutorial (02) – Applications key concepts, activities and resources);
- add(int groupId, int itemId, int order, int titleRes) – adds a new menu item with a text defined probably in strings.xml; the method allows you to define the order of menu items; by default, menu options are added based on the add() calls order; the menu item can be part of a menu group, identified by an id; menu groups are useful because they represent collections of menu items that share certain traits;
If we define String resources, exitOption and aboutOption, in strings.xml we can use them for menu options titles because we can access them using their ID generated in the R class:
<resources>
    <string name="hello">Hello World, MenuExampleActivity!</string>
    <string name="app_name">Android Menu Example</string>
    <string name="exitOption">Exit</string>
    <string name="aboutOption">About</string>
</resources>
If you want to define IDs for the menu options it is recommended NOT to use constant values, but to define final variables in your Activity class
public class MenuExampleActivity extends Activity {

    //ID for the menu exit option
    private final int ID_MENU_EXIT = 1;

    @Override
    public void onCreate(Bundle savedInstanceState) {
        super.onCreate(savedInstanceState);
        setContentView(R.layout.main);
    }
}
Each form of the add() method returns a MenuItem reference that can be used to define other properties. For example, you can set a shortcut key for that option. In this example, we will define the ‘x’ key as shortcut for the Exit option.
The next Java code sequence defines a menu with three options (About, Exit and Restart):
@Override
public boolean onCreateOptionsMenu(Menu menu)
    {
    //the menu option text is defined in resources
    menu.add(R.string.aboutOption);

    //it is better to use final variables for IDs than constant values
    //menu.add(Menu.NONE,1,Menu.NONE,"Exit");

    //get the MenuItem reference
    MenuItem item =
    	menu.add(Menu.NONE,ID_MENU_EXIT,Menu.NONE,R.string.exitOption);
    //set the shortcut
    item.setShortcut('5', 'x');

    //the menu option text is defined as constant String
    menu.add("Restart");

    return true;
}
- Important !
- If you want to define handlers that will respond to menu options selection it is recommended to assign unique IDs to menu items. The ID will be used to identify the selected option.
3. Submenus are managed by android.view.SubMenu objects which are created using the addSubMenu() method of the Menu reference:
- addSubMenu(CharSequence title) – adds a new submenu with a text given by the title argument
- addSubMenu(int titleRes)- adds a new submenu that has its text defined as a resource, (Android Tutorial (02) – Applications key concepts, activities and resources);
- addSubMenu(int groupId, int itemId, int order, CharSequence title) – adds a new submenu; the text is given as a constant String and you can control the option order in the menu; the itemId argument is used to identify the menu option when the user makes a selection; the submenu can be part of a menu group, identified by an id; menu groups represent collections of menu items that share certain traits;
- addSubMenu(int groupId, int itemId, int order, int titleRes)
To the previous menu, we will add an Options… submenu that has two menu items (Theme and Settings):
@Override
public boolean onCreateOptionsMenu(Menu menu)
{
    //the menu option text is defined in resources
    menu.add(R.string.aboutOption);

    //get a SubMenu reference
    SubMenu sm = menu.addSubMenu("Options...");
    //add menu items to the submenu
    sm.add("Theme");
    sm.add("Settings");

    //it is better to use final variables for IDs than constant values
    //menu.add(Menu.NONE,1,Menu.NONE,"Exit");

    //get the MenuItem reference
    MenuItem item =
    	menu.add(Menu.NONE,ID_MENU_EXIT,Menu.NONE,R.string.exitOption);
    //set the shortcut
    item.setShortcut('5', 'x');

    //the menu option text is defined as constant String
    menu.add("Restart");

    return true;
}
4. The handler for events generated by the selection of menu items is the Activity onOptionsItemSelected(MenuItem item) method. By overriding this method, you can define what will happen when the user selects a menu option. In this case, the problem is to identify correctly which menu item has been selected. The MenuItem reference, received as the method argument, can be checked using its getXXX() methods. It is recommended to use unique IDs for each menu option and to check them with the getItemId() method.
If the user selects the Exit option we should close the application:
    @Override
    public boolean onOptionsItemSelected(MenuItem item)
    {
    	//check selected menu item
    	if(item.getItemId() == ID_MENU_EXIT)
    	{
    		//close the Activity
    		this.finish();
    		return true;
    	}
    	return false;
    }
How to add a menu in a declarative manner, using a menu.xml file.
The declarative manner is the Google recommended development path as it allow future modifications without recompiling the Java source code and it is easier to understand for non Java programmers.
As you recall from Android Tutorial (02) – Applications key concepts, activities and resources, the Android project has some special subfolders used to manage its resources. One is \res\menu\ and its role is to manage xml files that describe Activity’s menus.
Ho to add a new menu.xml file in the \res\menu\ subfolder
If you want to add a new menu.xml file in the project \res\menu\ subfolder, you can create the menu subfolder (the generated Android project doesn’t have one) and add an empty menu.xml file, or you can use the ADT plugin:
1. Select the Android project in the Eclipse Package explorer panel;
2.Use File -> New -> Other in the Eclipse menu

3. Select Android XML File from the Android category and click Next;
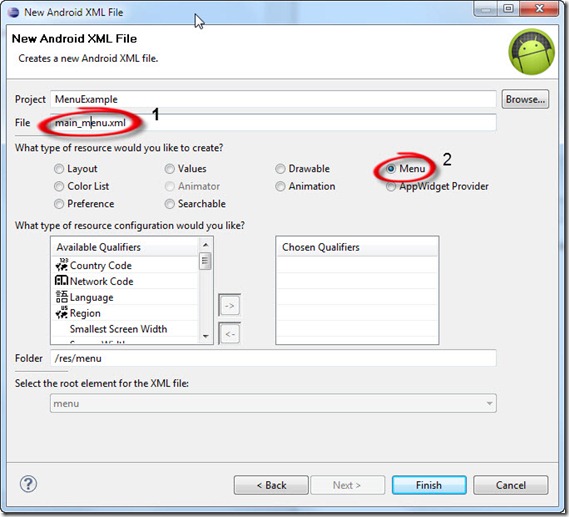
4. Set the file name as main_menu.xml (1), select the Menu resource type (2) and press Finish button:
- Observation !
- In the previous example it was better (as visibility) to name the file as menu.xml but the idea is to understand that the file name can have any value you want.
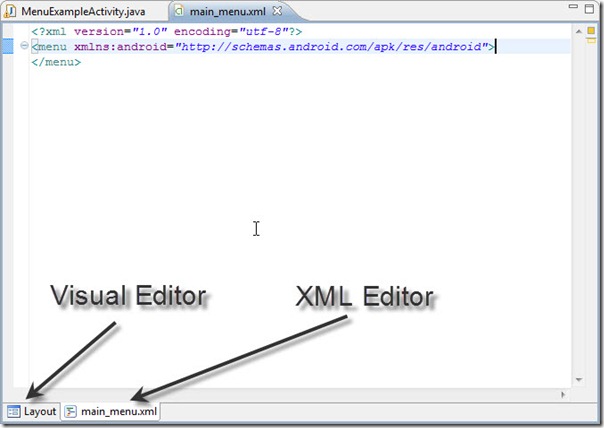
The content of the generated main_menu.xml file is:
<?xml version="1.0" encoding="utf-8"?>
<menu xmlns:android="http://schemas.android.com/apk/res/android">
</menu>
The first statement is required by any XML file as it defines the character encoding used in the file. The second statement defines the XML root element, which is the <menu> element.
How to edit the menu file using the XML editor
To edit the menu file using the XML editor, select it in the project folder and choose the main_menu.xml (if you used another name for the menu file, you will see a tab with its name) tab. The Layout tab will open the menu visual editor, described later in this article.
In order to define the XML description of the Android menu you must keep in mind:
- XML rules (case sensitive, parent-child structure, …)
- each menu item is represented by a <item>…</item> node;
- each submenu is represented by a <menu>…<menu> node defined inside a <item> one;
1. Menu options are managed by<item>…</item> elements which are defined as child elements for <menu> ones. Properties for menu options are defined using attributes. For example, android:title is used to set the menu item text.
As we did earlier, we define two String resources, exitOption and aboutOption, in strings.xml. :
<resources>
    <string name="hello">Hello World, MenuExampleActivity!</string>
    <string name="app_name">Android Menu Example</string>
    <string name="exitOption">Exit</string>
    <string name="aboutOption">About</string>
</resources>
We can this String resources for menu options titles because we can access them using the “@string/resourceName” syntax.
Also, if you want to define IDs for the menu options you can do it using the android:id attribute and the “@+id/item1” syntax.
The option shortcut is set with the android:alphabeticShortcut attribut.
The next XML description sequence defines a menu with three options (About, Exit and Restart):
<?xml version="1.0" encoding="utf-8"?>
<menu xmlns:android="http://schemas.android.com/apk/res/android">
    <item android:id="@+id/about" android:title="@string/aboutOption"></item>
    <item android:id="@+id/exit" android:title="@string/exitOption" android:alphabeticShortcut="x"></item>
    <item android:title="Restart"></item>
</menu>
- Important !
- If you want to define handlers that will respond to menu options selection it is recommended to assign unique IDs to menu items. The ID will be used to identify the selected option.
2. Submenus are managed by <menu>…</menu> elements which are defined inside <item> elements. To the previous defined menu, we will add an Options… submenu that has two menu items (Theme and Settings):
<?xml version="1.0" encoding="utf-8"?>
<menu xmlns:android="http://schemas.android.com/apk/res/android">
    <item android:id="@+id/about" android:title="@string/aboutOption"></item>

    <item android:title="Options...">
        <menu>
            <item android:title="Theme"></item>
            <item android:title="Settings"></item>
        </menu>
    </item>

    <item android:id="@+id/exit" android:title="@string/exitOption" android:alphabeticShortcut="x"></item>
    <item android:title="Restart"></item>
</menu>
3. As seen earlier, each Android Activity has a default empty menu. In order to edit its menu, we must get the Menu reference. Because android.view.Menu represent an interface, we can’t construct a new menu object and we are limited to the one constructed by the system. To do that, we will override the Activity class onCreateOptionsMenu(Menu menu) method.
    @Override
    public boolean onCreateOptionsMenu(Menu menu)
    {
  	// call the base class method
    	super.onCreateOptionsMenu(menu);
    	return true;
    }
4. In order to use the menu description from the main_menu.xml file, we must get the XML file content and inflate it into a Menu object. To do that, we will use the MenuInflater class which represents an Android framework class specialized in parsing and constructing menus from menu resource files:
    @Override
    public boolean onCreateOptionsMenu(Menu menu)
    {
    	//creates a menu inflater
    	MenuInflater inflater = getMenuInflater();
    	//generates a Menu from a menu resource file
    	//R.menu.main_menu represents the ID of the XML resource file
    	inflater.inflate(R.menu.main_menu, menu);
    	return true;
    }
5. The handler for menu items selection events is the Activity onOptionsItemSelected(MenuItem item) method. Overriding this method, you can define actions for user selections. In this case, the problem is to identify correctly which menu item has been selected. The MenuItem reference, received as the method argument, can be checked using its getXXX() methods. It is recommended to use unique IDs for each menu option and to check them with the getItemId() method. Fro each android:id=”@+id/idName” attribute value it is generated an unique ID value in the R class, R.id.idName.
Since Android 3.0, it has been added the
If the user selects the Exit option we should close the application:
    @Override
    public boolean onOptionsItemSelected(MenuItem item)
    {
    	//check selected menu item
    	// R.id.exit is @+id/exit
    	if(item.getItemId() == R.id.exit){
    		//close the Activity
    		this.finish();
    		return true;
    	}
    	return false;
    }
- Important !
- In declarative design, the android:id=”@+id/idName” syntax is used to define unique IDs for XML elements. Each ID can be referenced from the Java code using the generated constant value, R.id.idName.
How to edit the menu file using the Layout visual editor
To edit the menu using the Layout visual editor, select the XML menu file in the project folder and choose the Layout tab.

The Android Menu visual editor allows you to
manage existing menu elements: items, groups and submenus;
add new elements with the Add… button.

When you add the first menu element, by clicking the Add… button, you have two possibilities: an item or a group.

If you add an item, the visual editor allows you to set some of its attributes:

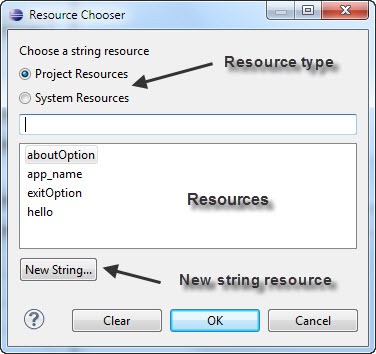
You can use the Browse button to select resource values for attributes like Title, shortcut, id:
After you had added a menu element, clicking again on the Add… button gives you the possibility to add a submenu or another item:

The menu generated by editing the XML file can be easily defined with the Android Menu editor. It will look like this:

If you have problems with the examples or you don’t understand our explanations, put a question in the comments and we will help you. Also, any suggestion or comment that will improve this material is appreciated.
Other topics that are part of this Android tutorial are accessible through Android Tutorial – Overview and contents.
Like it? Then share this post or check the external adds. Sharing is the best way to appreciate the author.
excelente
Many thanks for this wonderfull and helpfull example
Thanks,nice work.
Thank you!!
This is a great tutorial!
thank you very much for this wonderful tutorial
Thanks a lot!
Thank you 🙂