Recent years evolution in graphics and images for Web pages has led to the definition of Web 2.0 style. It is used to make a cool logo or other visual elements (buttons, menus, badges) for the Web site. The style is characterized by:
– using intense and vivid colors that attract attention to a particular element or visual symbol
– applying glow, emphasizing, reflection, glossy or mirroring effects to add visual details
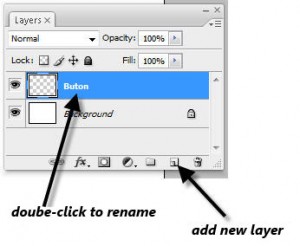
This example is for a Web 2.0 button or badge and it is made in Adobe Photoshop CS4 or CS3.1. Add a new layer called Button (double click the layer’s name to rename it), to separate the background element (later you could change the background color as you like).
2. To draw the button it is used a rectangle with rounded corners. It is drawn on the layer added at the previous step
Before drawing the button shape you must set the type of the form (we want a fill pixels type ; we do not want a shape layer) and the size of the angle for corners (let’s say 15 degrees).
3. To highlight the borders of the button we will make an inside edge effect. We will select the button shape using its layer. Holding down the Ctrl key, left-click on the layer’s button (on its icon). After that we have the selection of the button shape.
4. The selection is changed by reducing its size. Using the Select -> Modify -> Contract menu option, the selection is reduced by 5 pixels.

5. Selection is copied into a new layer via copy (Ctrl + C or Edit-> Copy) and paste (Ctrl + V or Edit-> Paste). The new layer is called Interior.
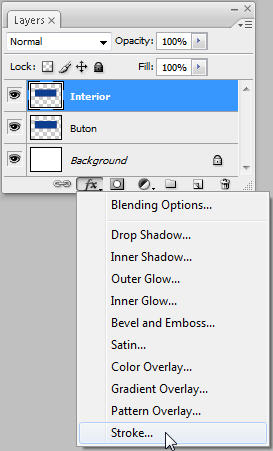
6. Select the layer created in the previous step, Interior, and add a Stroke effect.

Options for the Stroke effect are: Size: 2 px, Color: White, Blend Mode: Normal, Opacity: 70%

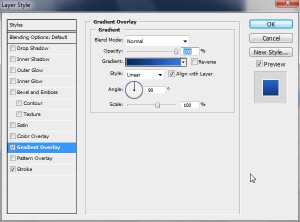
7. Also on the Interior layer add a Gradient Overlay effect between 2 colors: #052a61(dark blue) and #2c77e7 (light blue)

8. To generate the spot of light effect on the button, make an elliptical selection on the Interior layer using Elliptical Marquee Tool

The selection is made only on a part of the button.

9. The selection is copied into a new layer via copy (Ctrl + C or Edit-> Copy) and paste (Ctrl + V or Edit-> Paste). The new layer is called Light. If the copied selection, is out of position with other layers, rearrange it using move tool.

10 On the last created layer, Light, apply a Color Overlay effect with these settings Blend Mode: Soft Light, Color: White, Opacity: 65%

11. Add a new layer for the text of the button. Using Horizontal Type Tool add the text “Click me” using Font: Lucinda Sans, Stil: Demibold Roman, Size: 72
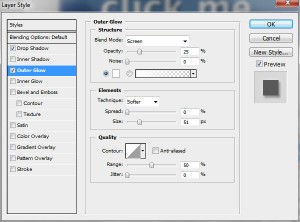
12 On the text layer add a Drop Shadow effect (compared to default settings I modified Opacity: 45%) and a Outer Glow effect with the settings Opacity: 25% Size: 51px, Color: White.


13 To enhance the button, apply a Bevel and Emboss effect, on the initial layer, called Button.

14 The obtained Web 2.0 button is
15 By altering the shape of the button, this technique will generate badges or other Web 2.0 symbols for your Web site.
Source project is available here
Other resources
• Adobe Photoshop CS3 documentation at http://livedocs.adobe.com/en_US/Photoshop/10.0/


