In this article we will see how to use the Eclipse IDE and the ADT (Android Development Toolkit) Plugin for Eclipse to create a very simple Android mobile application, the classic Hello World !. Despite its simplicity, the application just prints a message on the screen, its is very important to understand it, because its structure represents the core for any other Android mobile application.
Other topics highlighted in this article will help you to:
- create an Android mobile application project using Eclipse and ADT (Android Development Toolkit) Plugin;
- run the mobile application using different mobile Android emulators;
- understand and read the structure of the Android project.
Other topics that are part of this Android tutorial are accessible through Android Tutorial – Overview and contents.
The software needed to develop the Android Hello World mobile application are presented in Tutorial Android – Setting the development environment and some key topics referenced in this article have been described in detail in Android Tutorial – Applications key concepts, activities and resources.
How to create your first Android application, Hello World
- After you have started the Eclipse environment, set your workspace to a known location; in Eclipse you can do it selecting File –> Switch Workspace –> Other… from the Eclipse main menu;
- Form Eclipse menu, select File –> New –> Project(NOT Java Project);

Android Project category in the Eclipse New Project dialog
- If you have installed the ADT (Android Development Toolkit) Plugin and the Android SDK (if not check Tutorial Android – Setting the development environment), you will see in the New Project dialog the Android category; from it select Android Project;
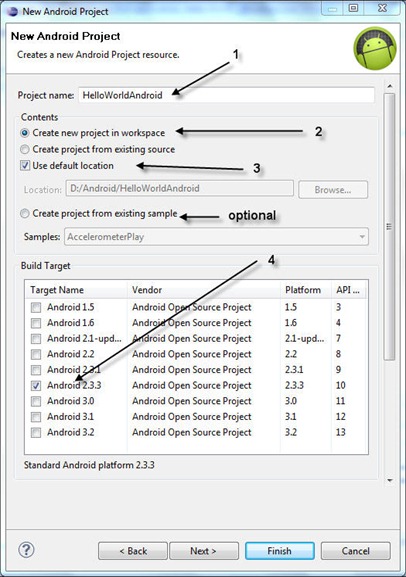
- Set the properties for your project:
- Project name: HelloWorldAndroid;
- Create new project in workspace: checked (default value);
- Use default location: by default in the Eclipse workspace or you can change it;
- Build target: select Android 2.3.3 (Gingerbread) because from version 3.0 (Honeycomb) the Android platform is intended for tablets and larger screen devices;
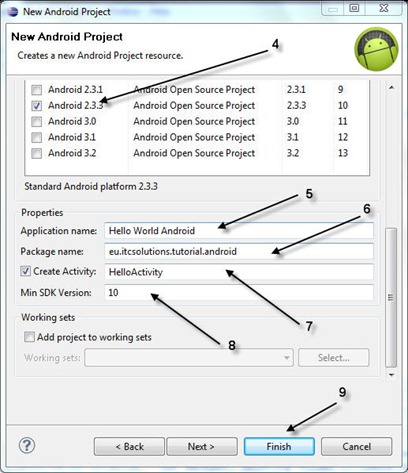
- Application name: Hello World Android (this is the name that will be shown in the application title bar);
- Package name: eu.itcsolutions.tutorial.android (this is the Java naming conventions for packages);
- Create Activity: HelloActivity (leave the option checked and set the Activity name);
- Min SDK Version: 10;
- That is all and press Finish.

New Android Project Properties - Part 1

New Android Project Properties - Part 2
In the last step of the wizard there is an optional setting: Create project from existing sample. The ADT (Android Development Toolkit) Plugin and the Android SDK comes with a lot of ready to run mobile application samples; you can check these applications later but for now we will create a simple Android application from scratch;
How to run your first application, Hello World
If we want to test the Android Hello World application we must use an Android Platform emulator – an Android Virtual Device (AVD). The emulators are managed from the Android SDK and AVD manager (read Tutorial Android – Setting the development environment).
Because the emulator or the Android Virtual Device (AVD) takes some time to load it is better to open it and to leave it opened between application testing sessions. As we will use the Android 2.3.3 (Gingerbread) platform we will create an AVD for it:
- open the Android SDK and AVD Manager from Start -> Programs -> Android SDK Tools or from Eclipse using the Window -> Android SDK and AVD Manager menu option;
- from the left panel, select the Virtual devices category;
- in the main panel click the New… button;
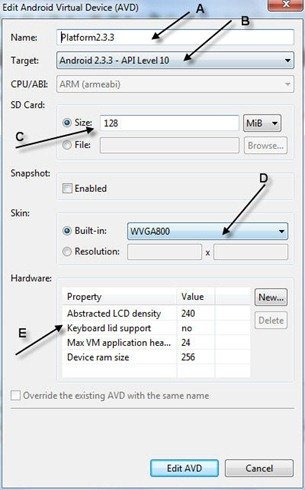
- in the Create new Android Virtual Device window set the name of the virtual emulator (A), the Android Platform (B), the size of the memory card (C), the emulator skin (D) and other hardware settings (E);

Android AVD Settings
- select the newly created virtual device (A) and start the emulator using the Start… button (B)

Start the Android Virtual Device from Android SDK and AVD Manager
- set the display settings:

Android Virtual Device Display Settings
- wait for the emulator to load (it can take up to 1-2 minutes):

Android Virtual Device for Platform 2.3.3
In order to start the Android Application, select it in the Eclipse Package Explorer panel and select Run –> Run (Ctrl+F11) in the Eclipse menu or the Run button in the Eclipse toolbar.

Test Android Application in Eclipse
If you want to change how to run the Android mobile application (maybe you want to test it) you can use the Run –> Run As option from the Eclipse menu.
Once you start your application,you will see the simple Hello World, HelloActivity! message on the Android emulator.

Hello World Android Application in Emulator
- Important !
- Between different application run sessions, DO NOT close the emulator because you must wait for the emulator to load every time. Just leave it running and every time you start your application, it will be reloaded.
How to read and understand the Hello World application
Despite its simplicity, the Hello World application is important because it helps you understand:
- the development steps;
- how to use the development tools;
- Important ! the Android mobile application structure and components;
The main reason for using Eclipse IDE and the ADT (Android Development Toolkit) Plugin is efficiency. The IDE will help you manage the project components and resources. And later, it will be very helpful in managing the look and components of the application.
If you look at the Android project structure in the Eclipse Package Explorer you will see some folders:

The structure of the Android Project in Eclipse
- src/– used to store all the Java files of the Android Project which are defined by the programmer; it contains utility and internal classes or classes associated with application Activities, Views, …; the HelloActiviy.java file contains the definition of the HelloActivity class, which inherits Activity; the HelloActivity class manages the main display of the Application providing handlers for events that notify changes in the Activity state (like onCreate(Bundle savedInstanceState))
public class HelloActivity extends Activity {
    /** Called when the activity is first created. */
    @Override
    public void onCreate(Bundle savedInstanceState) {
    	//call to the base class method
        super.onCreate(savedInstanceState);
        //set the layout of the display
        setContentView(R.layout.main);
    }
}
- gen/– used to store Java files generated by the IDE and the ADT plugin; as you recall from Android Tutorial – Applications key concepts, activities and resources for each resource in the res folder it is generated an unique ID in the R.java file; the ID is used to reference those resources without using strings; as you can see in the Activity onCreate() method from the HelloActivity class, the statement R.layout.main it is used to reference the main layout, defined by the main.xml file.
public final class R {
    public static final class attr {
    }
    public static final class drawable {
        public static final int icon=0x7f020000;
    }
    public static final class layout {
        public static final int main=0x7f030000;
    }
    public static final class string {
	//id of the application name string
        public static final int app_name=0x7f040001;
	//id of the Hello World, HelloActivity! string
        public static final int hello=0x7f040000;
    }
}
- Important !
- It is not recommended to modify directly the R.java file because it is auto generated by the ADT plugin.
- res/ – used to store the mobile application resources (Android Tutorial – Applications key concepts, activities and resources); each subfolder name has a meaning (i.e. the layout folder contains the settings, as an XML file, for the application layout); for example the res/values/ folder contains XML files that store different types of values, like strings in strings.xml:
- Important !
- Because resource files are compiled, DO NOT save resource files directly inside theres/ directory because it will cause a compiler error.
    Hello World, HelloActivity!
    Hello World Android
- AndroidManifest.xml – the XML file is the Android Manifest file used to declare the application components, identify user permissions, define the minimum API Level required by the application, define hardware and software features and more (you can read the Android Developers page on the Manifest File):
Regarding the display of the Hello World application, we have a single window/form that contains a text message: Hello World. HelloActivity!.

The Android Mobile Application Components
The main display of the Android mobile application is managed by an Activity object (Android Tutorial – Applications key concepts, activities and resources). The content of the window/form is composed by View objects. In the previous example, the text is part of an TextView control.
In the next posts we will concentrate on how to design and control the interface of the Android mobile application.
Other topics that are part of this Android tutorial are accessible through Android Tutorial – Overview and contents.
Like it? Then share this post or check the external adds. Sharing is the best way to appreciate the author.